Step into the realm of bathroom design and discover how to make a shower niche look built in, seamlessly blending form and function. This comprehensive guide will empower you to create a customized oasis that enhances your daily routine.
From selecting the perfect materials to mastering tiling techniques, we’ll delve into every aspect of crafting a built-in shower niche that complements your bathroom’s aesthetic and provides lasting functionality.
Niche Design and Planning
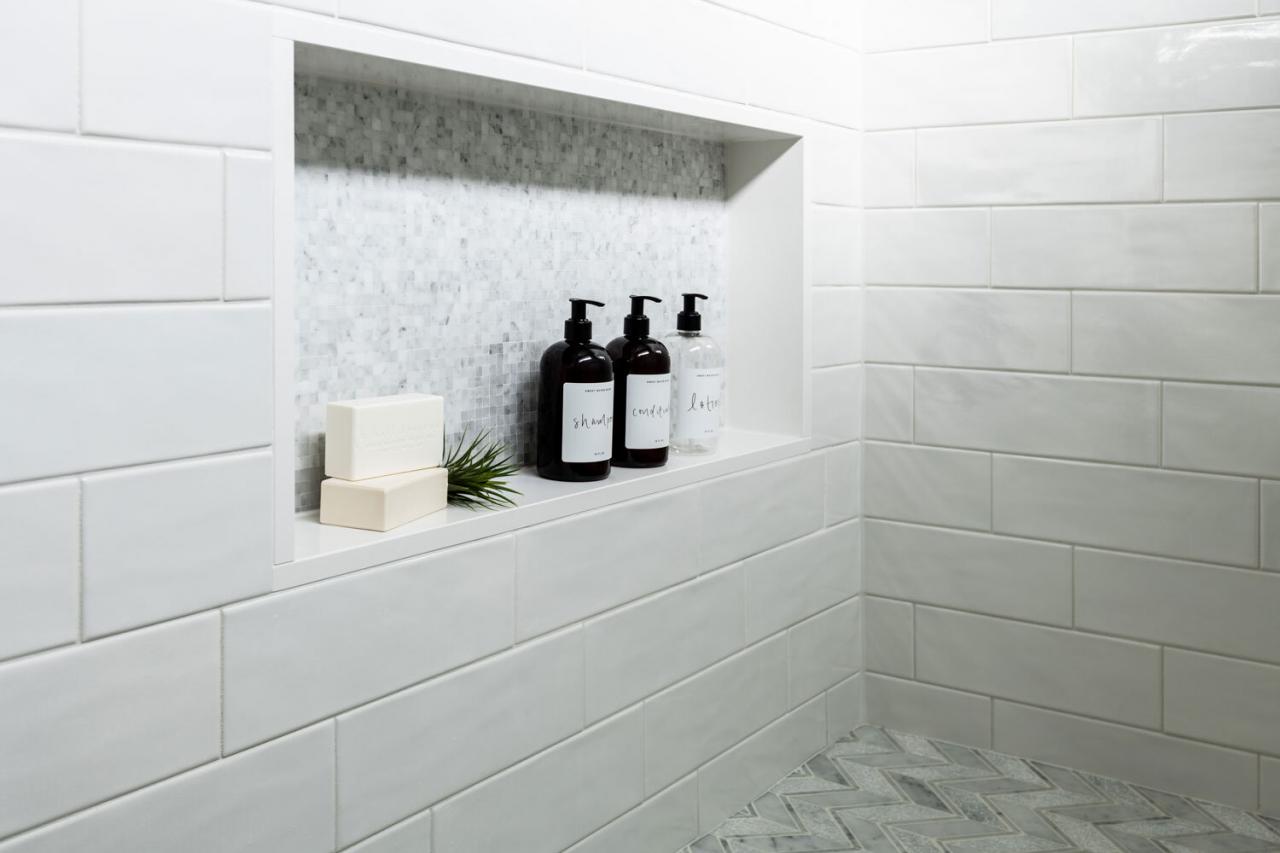
Creating a built-in look for your shower niche requires careful design considerations. These include choosing the right design, placement, and size, as well as integrating the niche seamlessly into the overall shower design.
Placement and Size
The placement and size of the niche play a crucial role in its built-in appearance. Consider the location of the showerhead, plumbing fixtures, and other shower elements to determine the optimal spot for the niche. The niche should be easily accessible and complement the overall layout of the shower.
Design Integration
Integrating the niche into the shower design is essential for a built-in look. Choose materials and finishes that match or complement the surrounding tiles or walls. Consider using a recessed design or adding a decorative trim around the niche to enhance its visual appeal and create a cohesive look.
Material Selection and Installation
Selecting the appropriate material for your shower niche is crucial for both aesthetics and functionality. The most common materials include:
- Ceramic and Porcelain Tiles:Durable, waterproof, and available in various styles and colors.
- Natural Stone:Luxurious, heat-resistant, and comes in a wide range of textures and finishes.
- Glass:Modern, sleek, and easy to clean.
- Acrylic:Lightweight, waterproof, and customizable to fit any shape or size.
- Stainless Steel:Durable, rust-resistant, and adds a touch of industrial style.
The installation process varies depending on the material. For ceramic tiles, apply thinset mortar to the back of the tile and press it into place. For natural stone, use a stone adhesive and apply it to both the niche surface and the back of the tile.
Glass and acrylic niches are typically prefabricated and can be installed using adhesive or screws. Stainless steel niches come in various sizes and can be attached to the wall using screws or adhesive.
Waterproofing and Sealing
Proper waterproofing and sealing are essential to prevent water damage to the niche and surrounding wall. Apply a waterproof membrane to the back of the niche and the surrounding area. Use a silicone sealant to seal all joints between the niche and the wall, and between the tiles or other materials used in the niche.
Niche Construction Techniques: How To Make A Shower Niche Look Built In
Crafting a shower niche that seamlessly blends with the surrounding wall requires meticulous construction techniques. Here’s a comprehensive guide to building both framed and recessed niches, incorporating shelves for added functionality.
If you’re looking for ways to elevate your bathroom’s aesthetics, consider giving your shower niche a built-in look. It’s a relatively simple DIY project that can make a big impact. If you’re planning to attend Coachella in 2024, be sure to check out the coachella youtube schedule 2024 to catch your favorite artists’ performances.
Once you’ve got the YouTube schedule figured out, come back to your bathroom project and continue giving your shower niche that built-in look. You won’t regret it!
Framed Niche Using Backer Board and Tile
Framed niches offer a versatile and cost-effective option. Here’s how to construct one:
- Mark the niche Artikel on the shower wall and cut the backer board accordingly.
- Install the backer board using screws or construction adhesive.
- Frame the niche opening with tile trim or cement board strips.
- Waterproof the niche using a liquid membrane or sheet membrane.
- Tile the niche using the desired tile material and grout.
Recessed Niche into Shower Wall, How to make a shower niche look built in
Recessed niches create a more built-in appearance. Follow these steps to construct one:
- Cut a rectangular opening into the shower wall using a wet saw.
- Install a waterproof membrane around the opening.
- Build a frame around the opening using cement board or tile backers.
- Waterproof the frame and niche interior.
- Tile the niche and surrounding area.
Incorporating Shelves or Storage
Add functionality to your niche by incorporating shelves or storage compartments:
- For shelves, install brackets or supports within the niche and place shelves on top.
- For storage compartments, create a recessed area within the niche using additional backer board or tile backers.
Tiling and Finishing Touches

Completing the niche’s built-in appearance involves careful tile selection, precise cutting and installation, and meticulous grouting and sealing. This section guides you through these essential steps to achieve a seamless and aesthetically pleasing finish.
Tile Selection and Layout
Choose tiles that complement the bathroom’s overall design and color scheme. For a built-in look, select tiles of the same size and shape as the surrounding wall tiles. Consider using contrasting colors or textures to accentuate the niche, or opt for a mosaic or patterned tile to add visual interest.
Cutting and Installing Tiles
Precisely cutting and installing tiles around the niche is crucial. Use a wet saw to ensure clean and accurate cuts. Measure carefully and make template cuts to accommodate any obstacles within the niche, such as shower fixtures or plumbing pipes.
Grouting and Sealing
Once the tiles are installed, grout the joints between them. Choose a grout color that matches or complements the tiles. Apply the grout using a grout float, ensuring it fully fills the joints. Allow the grout to dry completely before sealing it with a penetrating sealer.
This will protect the grout from moisture and stains, ensuring its durability.
Lighting and Accessories
Lighting and accessories play a crucial role in enhancing the aesthetics and functionality of a shower niche. By incorporating well-thought-out lighting and practical accessories, you can create a cohesive and inviting space within your shower.
Lighting not only illuminates the niche but also adds a touch of elegance and drama. Consider installing recessed lighting within the niche to create a soft and diffused glow. Alternatively, you can opt for LED strip lights that can be hidden behind the niche’s edges for a more subtle and modern look.
Accessories
Accessories like soap dishes and towel bars not only add convenience but also contribute to the overall design of the niche. Choose accessories that complement the style and finish of your niche. Consider installing a soap dish with a built-in drainage system to prevent soap scum buildup.
A towel bar integrated into the niche provides a convenient and stylish way to keep your towels within reach.
Maintenance and Care
To maintain the pristine condition of your built-in shower niche, regular cleaning is paramount. Use a mild, non-abrasive cleaner and a soft cloth to gently wipe down the surfaces, paying special attention to corners and crevices where dirt and grime tend to accumulate.
Avoid using harsh chemicals or abrasive materials that can damage the finish.Mold and mildew can become a nuisance in damp environments like shower niches. To prevent their growth, ensure adequate ventilation by leaving the bathroom door or window open after showering.
Additionally, use a mold-killing cleaner to disinfect the niche regularly.To preserve the built-in look over time, inspect the niche periodically for any signs of damage, such as loose tiles or grout. If any issues arise, address them promptly to prevent further deterioration.
Summary
With careful planning and attention to detail, you can transform your shower into a luxurious haven. This guide has equipped you with the knowledge and techniques to create a built-in shower niche that not only elevates the aesthetics of your bathroom but also provides practical storage solutions.
Embrace the possibilities and embark on a journey to enhance your daily showering experience.
Top FAQs
What is the best material for a built-in shower niche?
Ceramic or porcelain tiles are popular choices due to their durability and resistance to moisture.
How do I waterproof a built-in shower niche?
Apply a waterproofing membrane or sealant to the niche’s interior before tiling.
Can I add shelves to my built-in shower niche?
Yes, you can incorporate shelves using additional backer board and tile.